Origins
Foundational Tables of Multiplication
The multiplication table is the first piece of mathematics most of us memorize, and we memorize it as a list. Four times seven is twenty-eight. Nothing in the list suggests a shape.
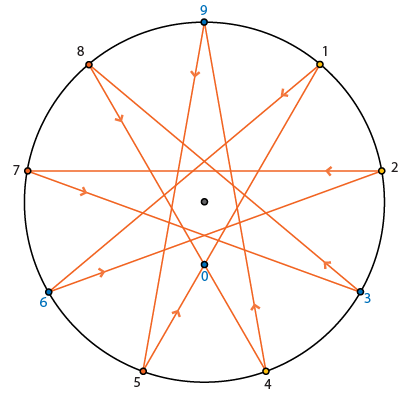
Give each answer its address on a circle of nine, the same digit-sum address a bookkeeper uses to check a sum, and every table becomes a path. The paths have a geometry the list hides. Some tables visit all nine positions and some visit only three. The tables of four and five trace the same nine-pointed star in opposite directions. Change the instruction from adding to doubling, and a six-step cycle appears, 1, 2, 4, 8, 7, 5. It is a small case of what Gauss called the order of a number, the same arithmetic that makes a repeating decimal repeat.
What kept bringing me back to these drawings was the change between four and five.
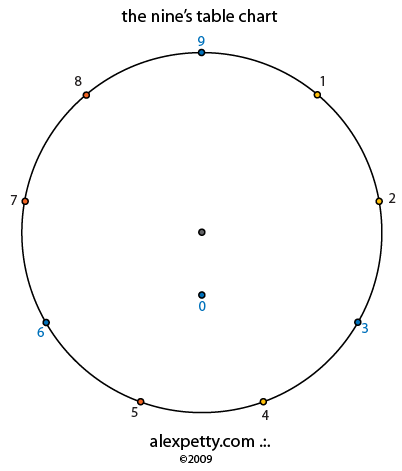
On the circle of nine, the first four multiplication tables trace their paths in one direction. With five, the direction reverses. Familiar lines appear again, with the arrows pointing the other way. In my drawings, the zero mark sits inside the circle, toward the gap between four and five. Nine is at noon. The two marks lie on the same vertical axis, with the numbered positions reflected on either side.
I thought about this as a reversal of charge, or flux. I was borrowing language for the things I wanted to understand, which were the change of direction, the place where zero seemed to fall, and the bilateral symmetry of the whole picture. Those were exploratory names. The drawings gave me a way to keep looking.
Start with the pair that caught my attention.
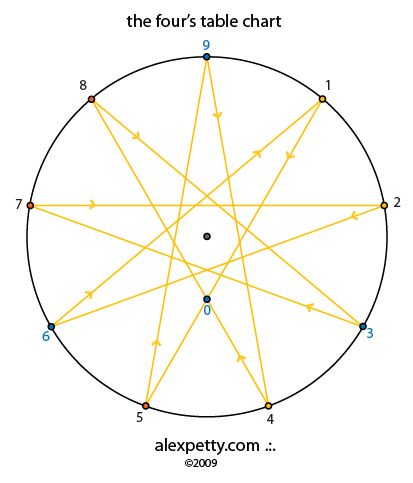
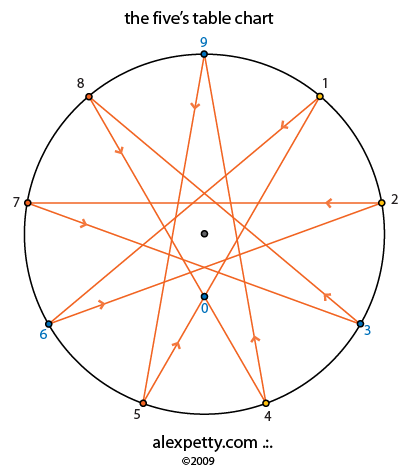
The paths are easiest to understand once we know what each step records. The geometry comes from ordinary multiplication tables, with the answers given a second address.
Giving an answer a place
On a number line, twelve sits farther along than six. A spiral can keep that outward progress while bringing numbers back to a familiar direction.

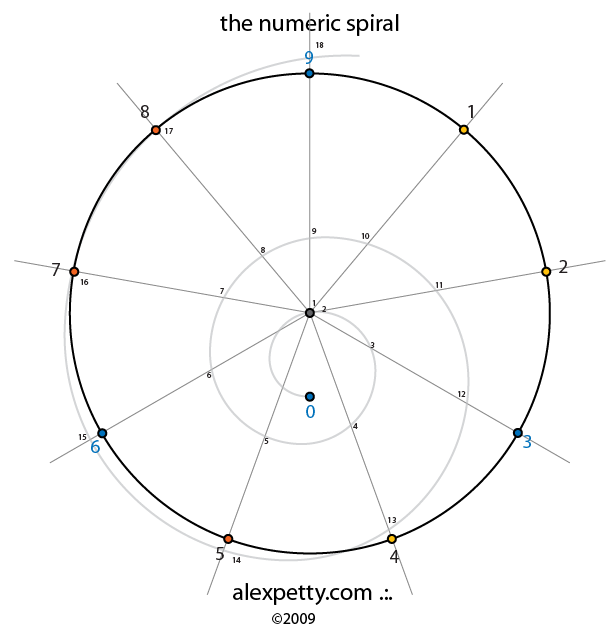
As in The Circle of Nine, numbers share a position when they have the same remainder after division by nine. Twelve belongs with 3, twenty belongs with 2, and thirty-six belongs with 9. In the tables below, the last of these is written as remainder 0. On the rim of the drawings it is labeled 9.
The historical drawings also retain a separate zero mark inside the circle. Both that mark and the perimeter 9 lie on the axis of reflection. When reading the arithmetic, 0 and 9 refer to the same remainder class. When looking at the drawing, their separate placement is part of the arrangement that interested me.
The ordinary multiplication tables come first, before any remainders are taken.
Open the original multiplication tables, before taking remainders
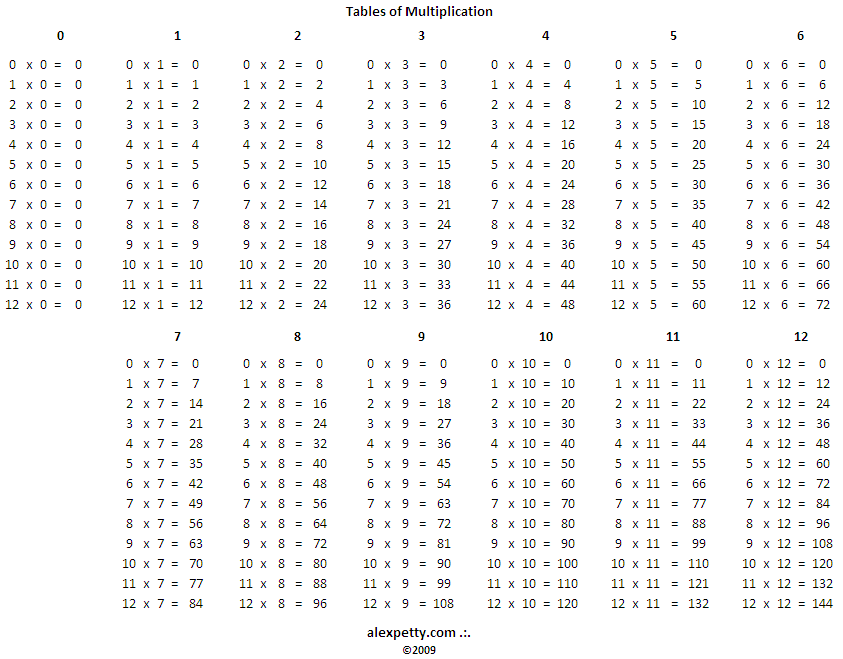

In the next table I kept the products and added a column marked m9 beside each one. That column gives the remainder after division by nine. We can now watch the answer grow and its position return, side by side.
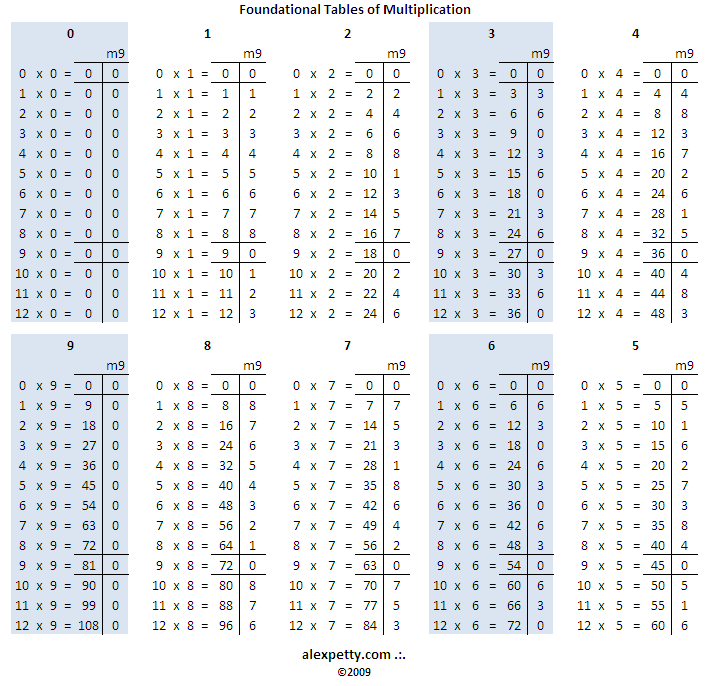

The products themselves keep increasing. It is their positions that repeat. The extra column lets us retain both facts without asking the drawing to do all the bookkeeping.
Seven forward, two back
Consider the two-times table. Its answers begin 2, 4, 6, 8, 10, 12, 14, 16, 18. Their positions are 2, 4, 6, 8, 1, 3, 5, 7, 9. Join each position to the next and the path visits all nine before starting again.
Now count by seven. On a nine-position circle, moving forward seven places lands us where moving backward two would land us. We get the same connections in reverse.
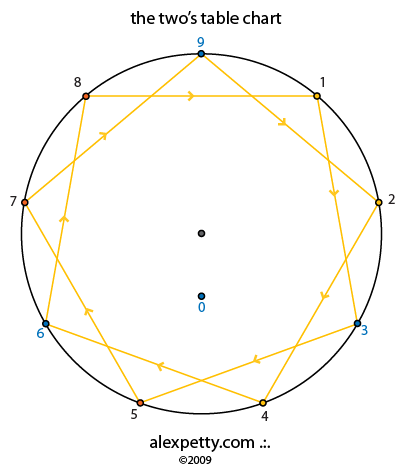
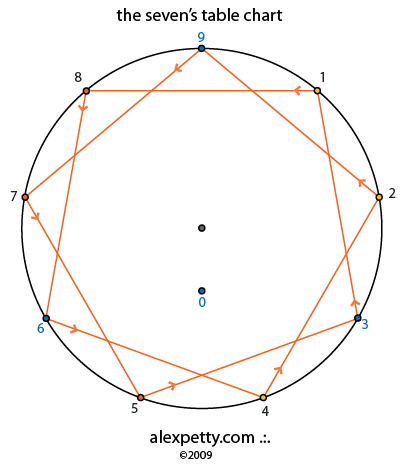
This explains the reversal between four and five too. Four steps forward and five steps forward complete a turn of nine. Five forward therefore has the same destination as four backward. The star keeps its lines and reverses its arrows.
There is a useful geometric detail at the bottom of the circle. With nine equally spaced perimeter positions, the vertical line through noon passes between 4 and 5. Steps of one through four take the shorter route forward, and steps of five through eight take the shorter route backward. The switch happens across that gap, along the axis where I had the zero mark. This was the meeting of arithmetic and visual arrangement that held my attention.
The same reflection pairs 1 with 8, 2 with 7, 3 with 6, and 4 with 5. Nine stays at the top. Once the rule is clear, we can look for the corresponding reversal in every pair of charts.
The short routes
Counting by three gives 3, 6, 9, then 12, 15, 18. The positions repeat after only three steps. Counting by six travels through those same three positions in reverse order.
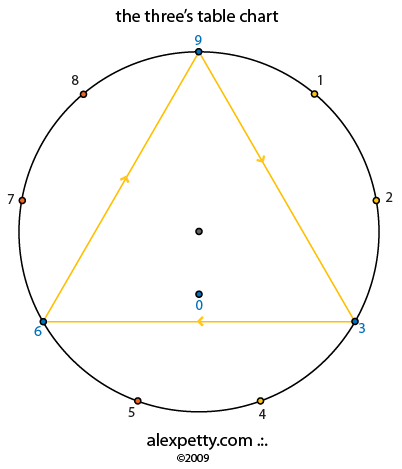
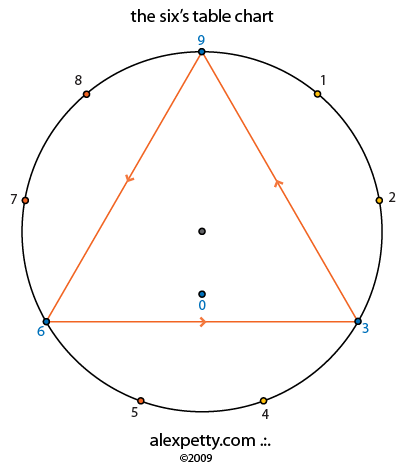
Nine has the shortest route of all. Every multiple of nine returns to the same remainder, zero, represented by 9 on the rim. There is no trip around the circle to draw.
These are all the possible lengths for the ordinary multiplication tables on this circle.
| Step being added | Positions visited before repeating |
|---|---|
| 1, 2, 4, 5, 7, or 8 | All nine |
| 3 or 6 | Three |
| 9 | One |
A return happens when enough equal steps add up to a multiple of nine. Three steps of three do it. So do three steps of six. For two or four, we need nine steps. This accounts for the lengths without having to extend each table indefinitely.
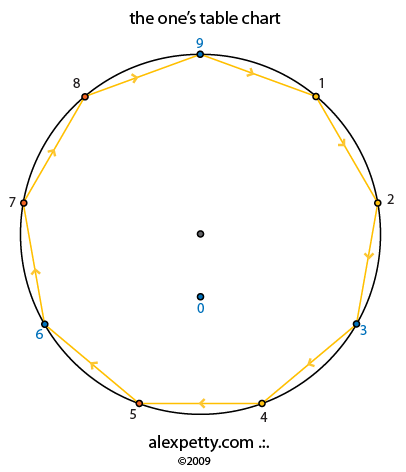
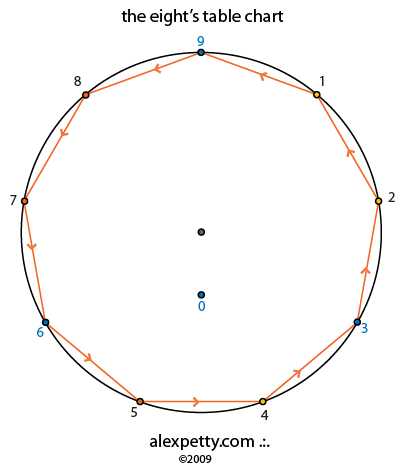
The remaining original charts are here as well, the perimeter walks of one and eight and the stationary nine-times table.
Open the original charts for one, eight, and nine
Keep doubling
There is another operation to try on the same circle. Instead of adding two each time, take the last answer and multiply it by two.
The two-times table begins 2, 4, 6, 8, 10, 12. Repeated doubling begins 2, 4, 8, 16, 32, 64. They agree for two steps, which is just long enough to invite a mix-up.
Start the doubling process at 1 and follow its positions.
1 → 2 → 4 → 8 → 7 → 5 → 1.
Here the return takes six steps. Six doublings turn 1 into 64, and 64 leaves remainder 1 after division by nine. The next doubling starts the same journey through the positions. We have a different path because we have given the numbers a different instruction.
The small grids below help connect that path to the original tables. Each entry is the row label multiplied by the column label, reduced modulo nine.
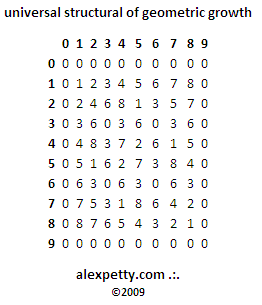
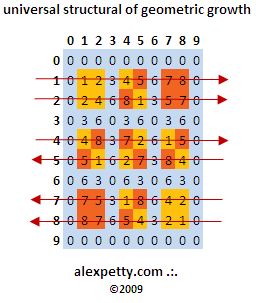
Those two halves reflect each other across the vertical axis, so 1 becomes 8, 2 becomes 7, and 4 becomes 5. After three doublings we have multiplied by eight, which acts like minus one modulo nine. Three more doublings bring us back. The reflection that interested me in the table paths is visible inside this cycle too.
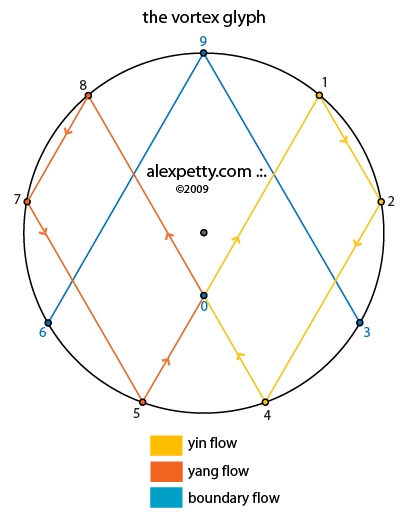
To undo a doubling step on the circle, multiply the position by five. Twice five is ten, which has the same address as one. Multiplying by two and then by five therefore restores the starting position.
This gives the reverse cycle.
1 → 5 → 7 → 8 → 4 → 2 → 1.
“Halving” here means undoing a doubling step among the remainder positions. With that rule stated, the two directions can be compared without losing track of what operation makes them.
Keeping the polarity picture in view
I also placed these paths over the polarity regions from The Circle of Nine. The regions keep 2, 3, 4 together on one side, 5, 6, 7 on the other, and 8, 9, 1 around the neutral top. The individual even-positive and odd-negative signs remain visible.
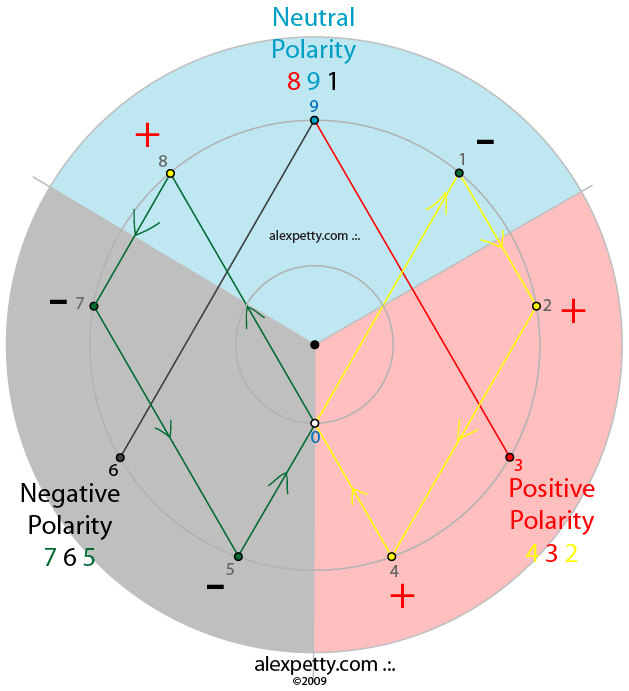
The sector labels and the halves of the doubling cycle record different groupings. Keeping them together let me see where a path crossed a region, where a reflected path went, and how the arrangement looked around the zero mark. This was the kind of visual comparison I was trying to make while I learned the arithmetic more fully.
A step and the whole picture
I still find it useful to return to these charts with a precise instruction in hand. Add a fixed step. Multiply the last value. Reverse a path. Each instruction has its own consequences, even when the resulting drawings share a line or a symmetry.
Nine is the base-minus-one position at noon in this decimal picture. Changing the base changes the corresponding digit-sum arrangement. In base eight, for example, that role belongs to seven. Doubling on seven positions gives 1, 2, 4, 1, a return after three steps. The question survives the change of base, while its answer changes with the arithmetic.
Long division later gave me another setting in which to follow a state until it returned. There the state is a remainder. Multiply it by the base, divide by the denominator, and carry the new remainder into the next step. When a remainder returns, the same division steps follow it. The early circles helped make questions about such returns natural to me.
What first held my attention here was the reversal around four and five, with zero on the axis and nine above it. I can describe it exactly now, and the description is short. Four steps and five steps make a full turn of nine, so five forward lands where four backward does, and every line of the four-star is a line of the five-star traveled the other way.
First written in January 2010, and rewritten in September 2026 around the original drawings.
Discussion
Sign in to join the discussion.