Origins
The Circle of Nine
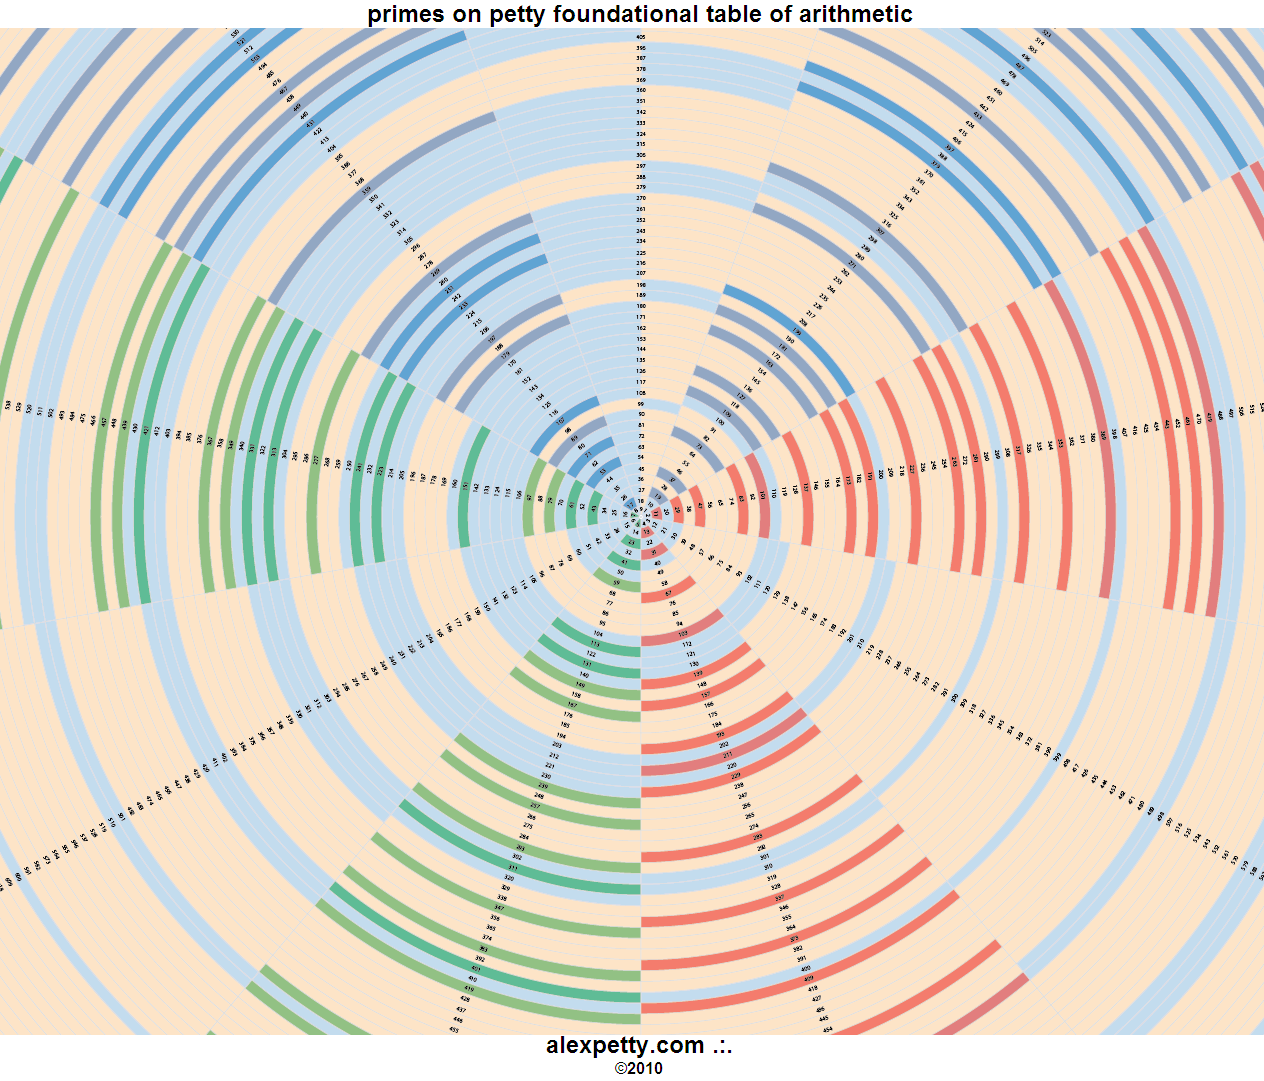
Long before calculators, bookkeepers checked their sums by casting out nines. Add the digits of each number, keep adding until a single digit is left, and the arithmetic of those single digits has to agree with the arithmetic of the full numbers. Fibonacci teaches the trick in the Liber Abaci of 1202. It works because every whole number sits at one of nine positions, and addition and multiplication respect those positions.
Put the nine positions around a circle and some surprising order appears for anyone with a pencil. The primes, which follow no simple formula anyone has found, are fenced in. Past 3, they never land on three of the nine spokes. The Fibonacci numbers grow without limit, yet their positions come back to the start every twenty-four steps, and halfway through that cycle every position trades places with its partner across the circle. This circle is where my own questions about numbers began, and the drawings here are the ones I made then.
When I began these drawings, I had an idea I called numeric polarity. I thought of even as positive and odd as negative. I was borrowing from chemistry, particularly the picture of incomplete valence shells, and wondering whether a similar language of opposition and balance might help me see something in the numbers.
It was a metaphor, and it gave me something to try. I did not yet have the number theory that would later help me frame these questions. I had the drawings, some intuitions, and a good deal to learn. The drawings are still useful to me.
This one begins with nine positions around a circle. Put 1 through 9 around the first ring. On the next ring, 10 sits behind 1, 11 behind 2, and 12 behind 3. Eighteen joins 9. Nineteen starts another turn. The numbers keep getting larger, but they now have familiar places to return to.
Now mark the primes.
Reading the circle
The positions 3, 6, and 9 collect the multiples of three. Beyond 3 itself, no prime can land on any of them. Three occupies its own spoke, which seems fair enough. Every other prime has to fit into the six that remain.
There is already a useful distinction here. The circle tells us where a prime can sit. It leaves plenty of room for composite numbers in the same places. Twenty shares a spoke with 2, and 35 shares one with 17. To tell them apart we still have to do some arithmetic.
The usual name for this arrangement is arithmetic modulo nine. Numbers share a position when they leave the same remainder after division by nine. I have labeled the position for multiples of nine with a 9, where the usual remainder notation would write 0. Add nine to any number and it stays on its spoke, one ring farther out.
Decimal digit sums give another way to find the same address. Thirty-seven leads to 3 + 7 = 10, then to 1 + 0 = 1. It belongs on the spoke through 1. This works because ten leaves a remainder of one on division by nine, as do a hundred, a thousand, and every further decimal place. Adding the digits preserves the remainder.
Nine also gives us a set of pairs, 1 with 8, 2 with 7, 3 with 6, and 4 with 5. Each pair adds to nine. In the drawing they face one another across a line through the top of the circle and its center. Follow one member of a pair, then its reflection, and a relationship that might have been buried in a table becomes easy to keep in view.
Two poles and a neutral seam
My even-positive, odd-negative idea gave me a way to think about the neighbors of a position. Around 3 sat the even numbers 2 and 4. I imagined their positive contributions meeting at 3, a sink between them. Around 6, the odd neighbors 5 and 7 supplied the opposite signs. Three and six became the two poles of the picture.
At the wrap around the circle, 8 and 1 brought opposite signs together. I pictured them neutralizing around 9, or 0 in the remainder notation. That gave me three regions, with 2, 3 and 4 positive, 5, 6 and 7 negative, and 8, 9 and 1 neutral.
The chemical metaphor helped me hold this arrangement in mind and ask questions of it. The original drawing keeps the individual signs and the larger regions in the same view.
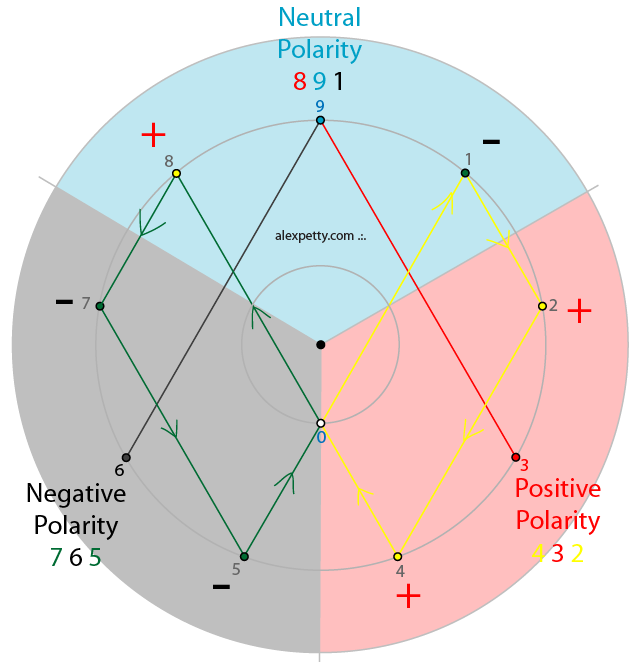
There are two things to keep track of here, the number and its position. Add nine to 2 and we get 11. The parity changes, but the spoke stays the same. The signs attached to the labels on this wheel therefore describe the drawing’s convention, and the parity of an integer must still be read from the integer itself. A number such as 14 falls in the sector I called negative because it shares the position of 5.
Watching the primes occupy the picture
Once the regions were in place, I wanted to see how the primes occupied them. A prime on each of the two spokes beside a pole would fill the available positions on that side. I could look for such pairs, follow the gaps between them, and compare what was happening on the other side of the drawing.
The long tables grew out of that comparison. Unroll the circle into columns, keeping one turn on each row, and the prime marks become bands. The positive positions 2 and 4 are red, the negative positions 5 and 7 are green, and the neutral boundary positions 1 and 8 are blue. I wanted enough rows in view to see how the bands filled, broke, and resumed.
Then I collapsed columns onto one another. This brought the question of overlap into the picture. Would the prime marks occupy the same space when the columns were superimposed?
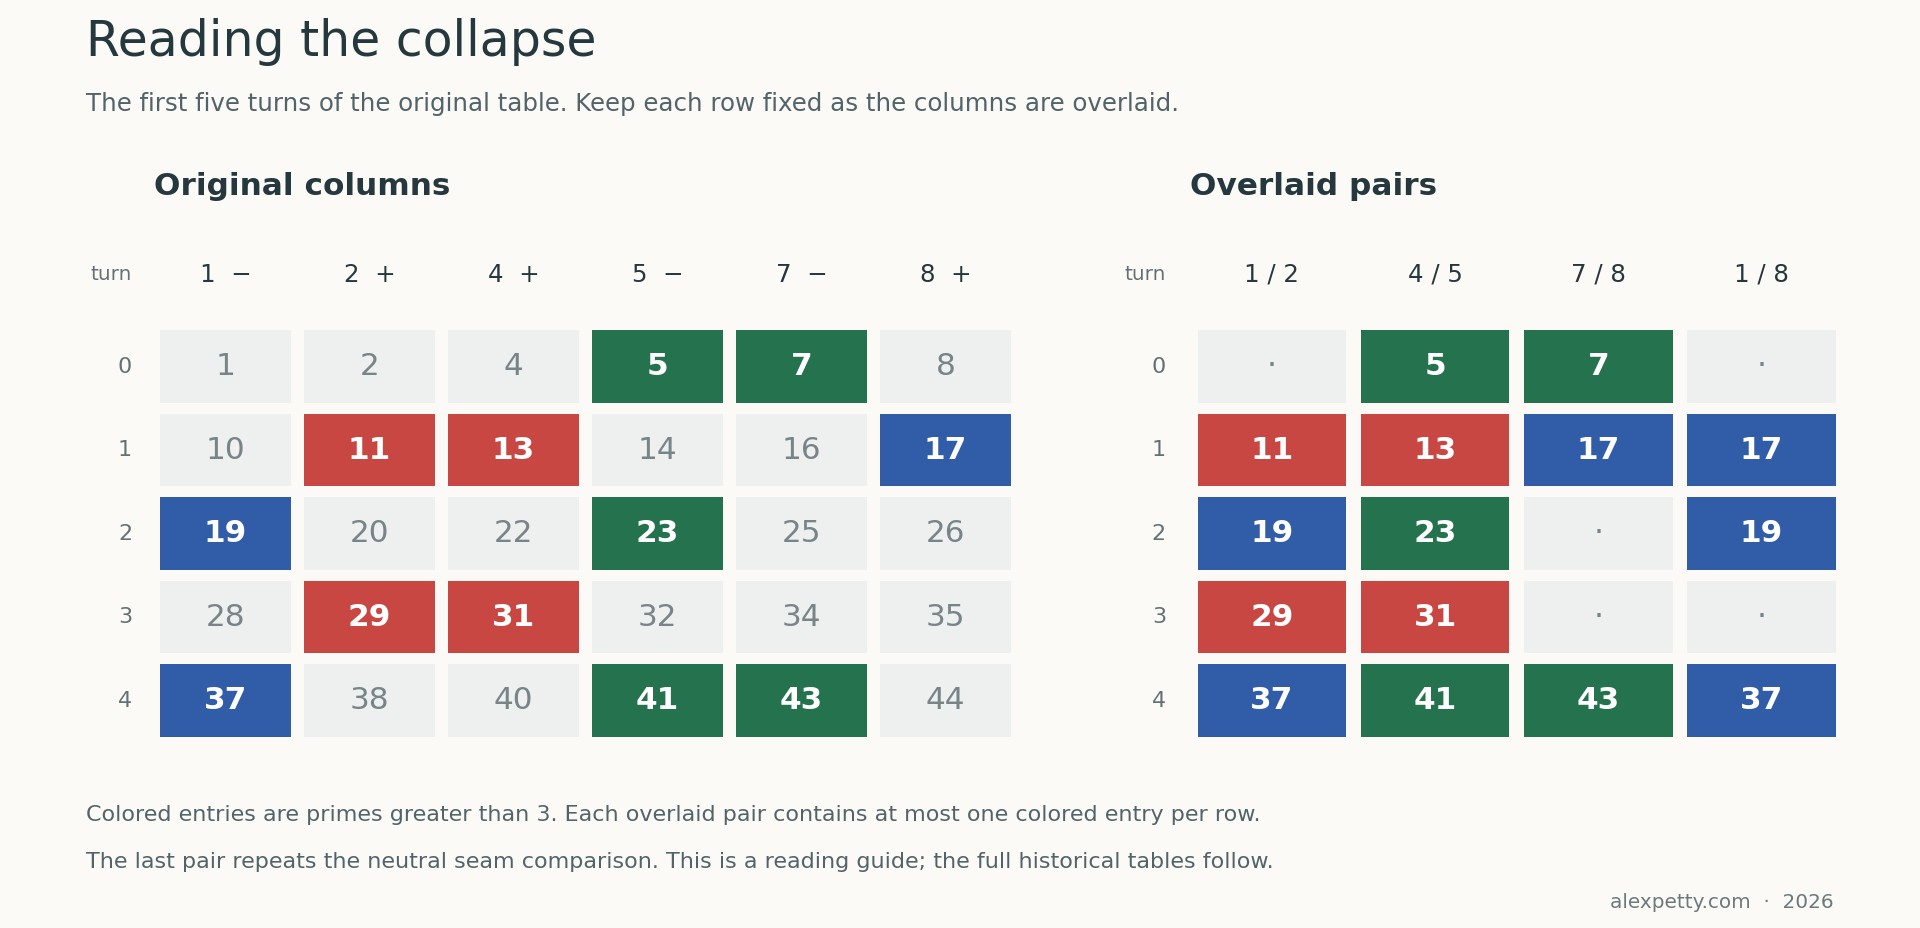
The prime marks stay separate in this collapse. The long view made that separation visible over many turns, and the collapsed view let me inspect it directly. That was interesting to me. I could change the arrangement while still following how the primes respected the signs I had assigned to their positions.
For this particular overlay, we can also explain the separation. Each paired slot brings an odd integer together with an even one. Beyond 2, a prime can occupy only the odd position. On the next turn we have added nine, so the parity changes and the other position becomes available. The neutral seam compares 1 and 8 in the same row, which also have opposite parity. The drawing puts this alternating occupancy where we can see it.
The two complete originals follow. Expanding them keeps the numbers readable while letting the full run of bands be inspected.
Open the original long polarity table, with the first 6,500 points


Open the original collapsed table and neutral seam


Four primes at a time
Watching the occupancy of those sides is what drew me to the prime clusters. I was looking for places where primes seemed to fill a polarity side, then inspecting the whole arrangement for something I might discern visually. The clusters gave me small, concentrated examples to compare.
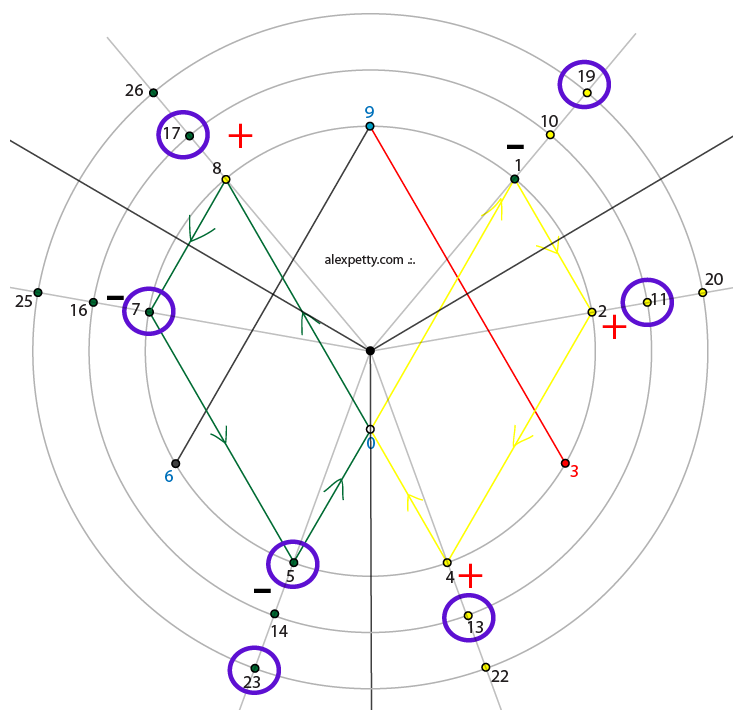
Consider 5, 7, 11, and 13. Five and seven fill the two prime-carrying positions beside 6, and eleven and thirteen fill the two beside 3. The gaps between these four primes are two, four, and two.
The same gap pattern appears at 191, 193, 197, 199, and again at 1871, 1873, 1877, 1879. On the circle, these three examples occupy different collections of spokes.
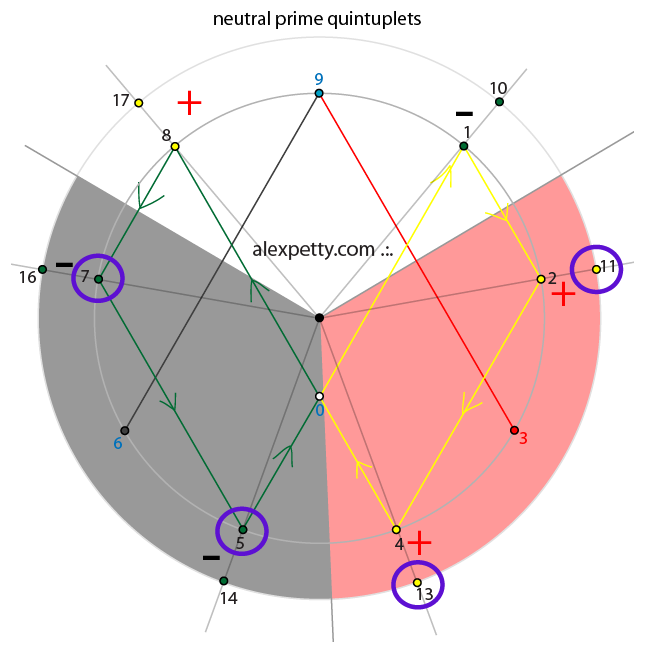
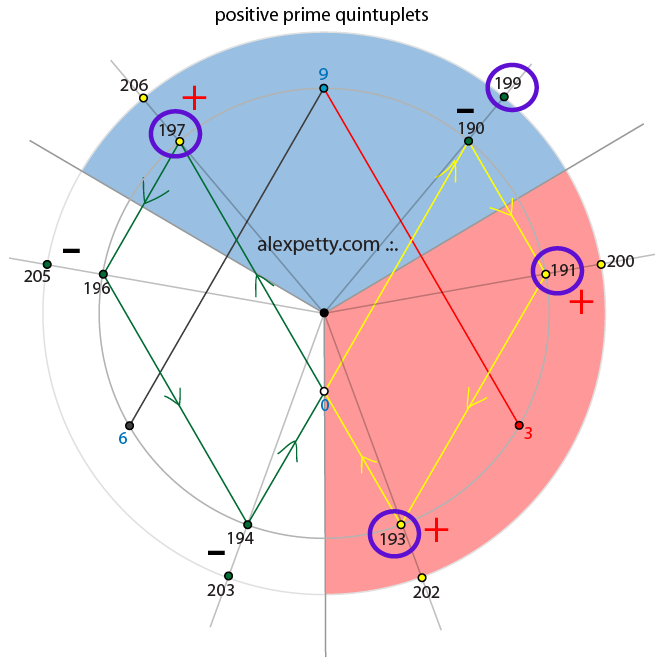
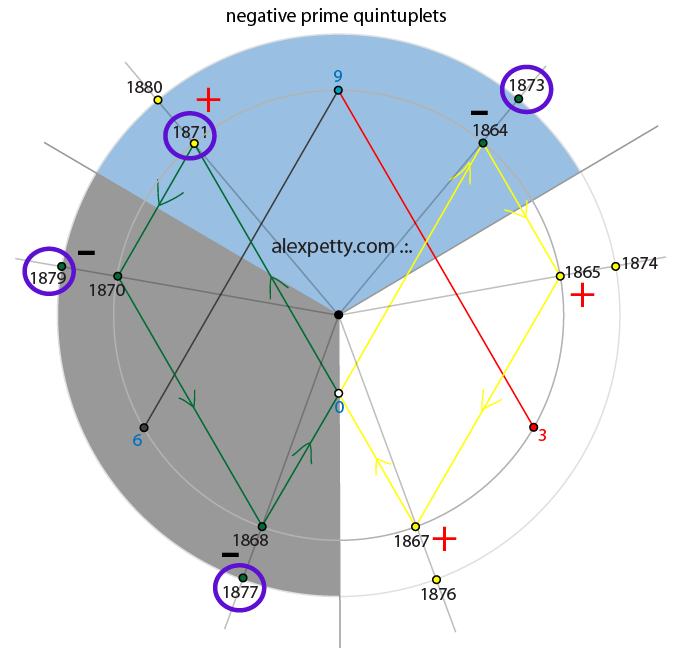
The drawings call these groups “prime quintuplets,” though each group circled here holds four primes.
For this particular gap pattern, there are three possible placements. The first prime must sit at position 2, 5, or 8. Any other starting position would put at least one of the four numbers on a multiple of three. Starting at 2 gives the second drawing, starting at 5 gives the first and starting at 8 gives the third.
That restriction explains the three arrangements. It applies to the positions of any four primes with these gaps. Finding further examples in which all four numbers are prime is another task, and the drawing gives us a consistent way to compare them when we do.
A sequence comes back
The Fibonacci sequence gives us a different visitor. Start with 0 and 1 and keep adding the previous two numbers, which gives 0, 1, 1, 2, 3, 5, 8, 13, 21 and so on. Put each result at its position on the circle.
Thirteen lands on 4. Twenty-one lands on 3. Thirty-four lands on 7. The whole numbers grow, while their positions follow a cycle of twenty-four steps.
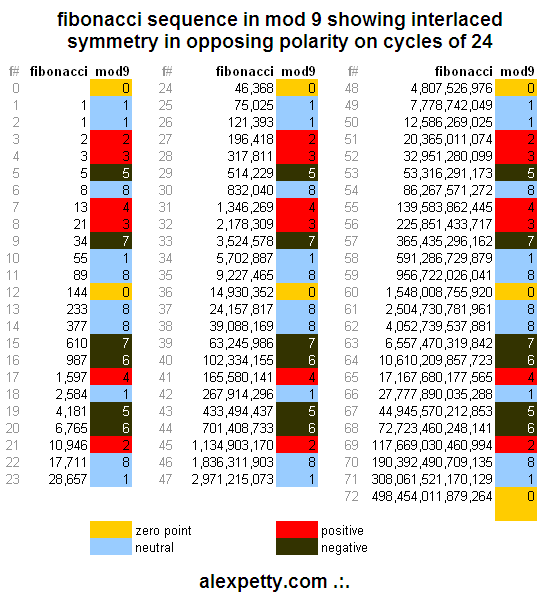
The halfway point is worth following. The two 1s near the beginning become two 8s twelve terms later. The 2 becomes a 7 and the 3 becomes a 6. The positive and negative sectors exchange places. The neutral positions remain in the neutral sector.
There is a reason the cycle can be checked so simply. Each new Fibonacci number depends on the previous two, so two consecutive remainders tell us what comes next. At terms 24 and 25 the pair is back to 0 and 1. The same rule then repeats the same journey. Twelve steps earlier the pair was 0 and 8, the complements of the starting pair, and addition carries that complementary relation forward.
The table lets us see both things at once, the numbers becoming very large and their positions returning to a small, orderly set of relationships. This is the kind of comparison I wanted the drawings to make possible.
Looking at it now
Polarity was one part of the intuition. Another was that the base mattered. I wanted to know what would happen to these arrangements if I changed the number system in which I was writing them. Which features belonged to the numbers, which to their decimal representation, and how did the two work together?
Long division seemed to me a way of unzipping the structure. It already takes a calculation with integers apart into successive digits and remainders. I wondered what else might become visible if I followed that process through whole families of fractions and compared the paths. That intuition helped lead me into the later work.
I was learning the number theory as I went. Heath-Brown’s books were a large part of that education, along with other reading. Derbyshire’s book on the Riemann hypothesis became a particular favorite. I returned to it often, and it is still a favorite today.
The later work asks when the digits of those fractions agree, how the agreements are distributed, and what remains after an appropriate average has been removed. Complementary positions return as exact relations between quantities that can be counted. Getting from these pictures to those statements required new definitions and separate arguments. The pictures kept giving me things to ask about.
I can now bring more precise questions back to an old drawing. Which information does a formula preserve? What happens to the paths when I change the denominator? Does something remain visible here that a single numerical summary leaves out? Seventeen years later, these images still inform my thinking.
First written in November 2009, and rewritten in September 2026 around the original drawings.
Discussion
Sign in to join the discussion.